Adding a Demand Pressure at an end node
To add a demand pressure to an end node:
- Click the Add Demand (Pressure) button,
 , on the tool bar.
- When you click the Add Demand (Pressure) button, the demand pressure symbol is displayed next to your mouse pointer when the pointer is in the Drawing pane.
- Click on the end of a pipe on the Drawing pane where you want to add a demand pressure.
- Click Yes when asked ‘Do you wish to change the type of node to an end demand pressure?’
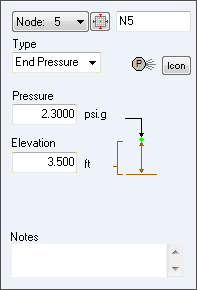
- The demand pressure is added to the pipe system, and is selected on the Drawing pane. Define the demand pressure’s properties in the Node pane.

Figure 98 Node pane for end pressures
- End Pressure is automatically selected in the Type list.
- Click the Demand Pressure Scroll Up or Scroll Down button to select the demand pressure image you want displayed on the pipe system drawing.
- The image you select does not affect any of the demand pressure’s properties or values.
- Type the required pressure for the end of the pipe in the Pressure field.
- Type the elevation at the demand pressure in the Elevation field.
- Type any applicable notes regarding the demand pressure in the Notes field.
- To add additional demand pressures to the system, repeat Steps 3 – 12.

