Adjusting image properties
To display the Image Properties dialog, click the Drag and Move Items button,  , followed by the Edit button,
 ![]() , at the top left of the image to be modified.
, at the top left of the image to be modified.
Enter the desired width and height (in pixels) to scale the image. The image will be dynamically scaled.
The original image size and aspect ratio can be restored by clicking the appropriate Reset button.
The image transparency can be adjusted by using the Fade image slider control. Moving the slider to the left will increase the transparency of the image, whilst moving the slider to the right will decrease the transparency.
A colored image can be made black and white (Grey Scale) by selecting the Grey Scale check box.
Select the Hide Image checkbox to conceal the image (whilst keeping the image object on the drawing).
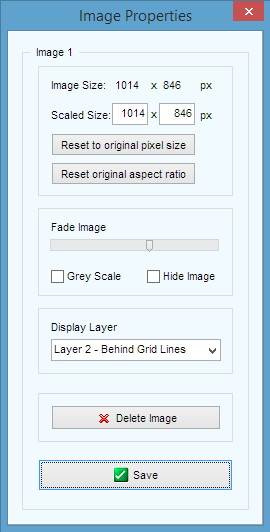
To change how the image appears relative to other system drawing elements, click Display Layer and select the required option as follows:
|
Display Layer |
Description |
|
The image will be positioned on layer 1, above the grid lines. |
|
|
Layer 2 – Behind Grid Lines |
The image will be positioned on layer 2, behind the grid lines. |
|
Layer 3 – Behind Layer 2 |
The image will be positioned on layer 3, behind layer 2. |
The image can be permanently removed from the system drawing by clicking the Delete Image button.